
The Perfect (Cheap) Bunny Cage
Brought to you by Leah Fargotstein, courtesy of BUNS
So you've looked at all the indoor bunny cages out there, gasped at the prices and wondered what you can do to give your bunny a place to call her own without skipping a month's rent. This guide was made with you in mind. Create your own bunny mansion for as little as $49 of materials!
The dimensions of this bunny house will be 28" wide by 42" long by 28" high. Note that this will NOT fit through most single door frames, so if you're planning on putting it in a bedroom, build it there or make it narrower or shorter (very simple).
Materials:
1-2 packages Creative Cubes from Costco (minimum 26 panels) ~ $36
If you do not have a Costco card, you can also buy Neat Idea Cubes
from Staples or Office Depot, which are almost identical, but cost a little more.1 package nylon cable ties or zip ties from Home Depot (minimum 100) ~ $4
1 piece indoor/outdoor or cheap carpeting from Home Depot (dimensions 28" by 42") ~ $7
1-3 large binder clips from Long's, Staples, or Office Depot ~ $2
Optional: a piece of plywood or Plexiglas 28" by 42" to cover floor underneath the carpet, but on top of the panels. This will make the floor less bumpy and prevent any pee that seeps through the carpet from reaching your floor.
Tools:
Sharp scissors or box cutter to cut the carpet
Tape measure
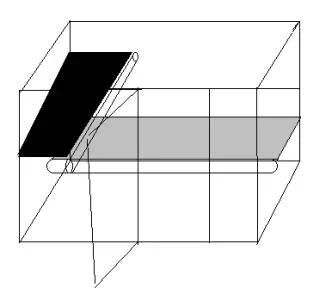
Finished Cage:
More or less, this is what your cage should look like at the end:

Step by Step:
First, throw away those little plastic circles that they use to connect the panels. They are frustrating to use and too easily popped off by curious bunnies.Your panels should each be 14" by 14", 9 squares by 9 squares. If they're not, you'll have to resize my dimensions, but the basic principals are still the same.
Take two panels and lay them side-by-side. String the zip ties around every other set of adjoining squares to hold them together, using about 5 zip ties per set of panels, and pull them tight. You can trim the excess tie hanging out the end if you like. Since the bottom will be covered by carpet, you don't have to. Once you have done that, string more panels to make a single grid of 3 panels by 2 panels. This will be the floor.
On the 2-panel side, string 2 panels onto the edge of the side, like you would be adding another set of panels to make the floor 2 by 4 panels, and string them together. Don't pull the zip ties quite as tight. Do the same to the other end so you now essentially have a grid that is 2 panels by 5 panels. On the long 5-panel side, attach 1 panel to each of the 3 middle panels, and to each other. Do the same on the opposite side, but leave a middle panel empty. If you've already tied it, don't worry. Just cut the ties with a pair of scissors. What you should have on the floor should look like this, with all touching sides tied together:

Since this is too short for most bunnies to stand straight up, I make each wall 2 panels high, tying on panels one at a time, then to each other. This also allows for shelf additions later. For the door, tie two panels together. Then attach the set to one side or the other of the empty space, but not to both, or to the top or bottom. The door should be able to swing out.
For the roof, make a grid of 3 panels by 2 panels the same way you did the floor, and attach that to the top of the panels, except for the door.Alternately, if you run out of panels, you can use a piece of fabric or an old bed sheet to cover the top.If you have a particularly unadventurous or short bunny, you can leave it open, but even the laziest bunny may try to climb out if really bored.
Cut your carpet or ask the nice people at Home Depot to cut it for you. Put that over the floor so the bunny won't be stepping on the thick wire. Use binder clips to keep the door shut, and you now have your very own bunny palace!
Additions:
Now that you've finished your cage, you may be saying to yourself, "This is nice, but I wanted something that would look like those fabulous condos from Leith Petwerks or KW Cages." Have no fear. For a little more money and a little extra time, you too can have a condo the envy of all your bunny-owning neighbors. This will require an electric drill, another trip to Home Depot, and some basic knowledge of woodworking, such as "don't cut off your fingers." Find a friend who's comfortable with a hacksaw if you're not, or pay for someone at Home Depot to do the cutting and drilling for you. I don't know how much the wood costs, as I got scraps from the UCSB woodshop, but it shouldn't be more than $15 total.
Materials: (assuming you have already built the previous cage)
5 panels from Creative Cubes set, leftover
2 pieces of door skin, one 14" by 42", the other 14" by 28" this is very thin, flexible plywood that any home store will carry. Don't be afraid to ask the employees where it is.
2 3/4" thick wooden dowels, one 44" long, the other 30" long
2 pieces indoor/outdoor or other cheap carpet, one 14" by 42", the other 14" by 28" ~ $5
More nylon cable or zip ties, but make sure 4 are at least 5 inches long, $5
Tools:
Tape measure
Hot glue gun with 3 or so glue sticks, to attach carpet to door skin, $5 at craft store
Box cutter/Sharp scissors
Hacksaw, $5 at home store
Electric drill, borrow from nice neighbor :->
The idea here is to make one shelf of 3 panels by 1 panel, 6 squares up, and another shelf 2 panels by 1 panel, 12 squares up. This should work well for bunnies less than 7 lbs. If your bunny is bigger, you may need to eliminate the upper shelf and raise the bottom shelf. Or, if you're really dedicated, make the cage 3 squares high instead of two, and raise both shelves to about 8 squares and 16 squares, respectively, or more, depending on the size of the bunny.
Step by Step:
Make a grid of 3 panels by 1 panel, tying them together. Make another grid of 2 panels by 1 panel. Using a hacksaw or a box cutter (easier), cut your door skin into 2 pieces, one 14" by 42" or slightly smaller, the other 14" by 28"or slightly smaller, if it isn't already cut.
Using the electric drill, drill 8 holes in the first piece, 4 along each long end, evenly space, starting 1/4" from the corner, all about ¼" from the edge. Spacing is not crucial. Just make sure you don't split the wood by drilling too close to the edge. If you have an old phone book, you can use this to back up your piece of wood as you drill into it. When you're done with it, you can give it to your bunny for hours of shredding fun.
Now, take the other piece of wood and drill 6 holes in it, 3 along each side, so one in each corner, and one in the middle of each long side near the edge in the same manner.
If you haven't cut your dowels, do so now with the hacksaw. Now, about 1/2" from end, drill straight through the dowel so you can see down to the ground. Turn it around and do it again. Repeat with the other dowel.
At this point, you'll probably want to take off the roof of the cage to make it easier to maneuver. Nail clippers work great for cutting the tightened zip ties.
Now we're ready to assemble. Attach the 3 by 1 panel shelf 6 squares up on the side away from door. Use lots of zip ties, at least 1 every 2 squares, and use 2 per square at the very edge. Take your long dowel and run it through under the very front square attaching the shelf to the cage, right under the shelf itself. It should be resting on top of the fifth square from the bottom. This is to provide extra support for both the cage and the shelf. Take one zip tie and run it through the hole in one end of the dowel. Run one end of the zip tie around the metal where the shelf connects, then zip tight. This is a little awkward, but it works. The dowel should lift slightly off the bar it was resting on when you tighten the tie. Do the same on the other end.
Prepare the hot glue gun as it says on the package. The metal tip is the most dangerous part, as it can get extremely hot and burn you. Make sure this is not touching anything, and read the instructions.
Take your piece of wood and fit it onto the shelf. If it is too large to fit, trim it. Use the holes you've drilled in it to zip tie it to the metal directly underneath. It may bulge a little, but should be fine. Remember to trim the zip ties in the middle, as these will be dangling into your bunny's face.
Once the glue gun is heated, dribble some hot glue onto the wood and attach the carpet. There's really no formula to this — just don't get so caught up in using the glue that it dries before you can put the carpet on. You may want to glue it in stages, rolling the carpet up, placing one end on a pre-glued part of the wood and gluing under it as you slowly unroll it.
For the second shelf, repeat this process except attach it 12 squares up, 6 squares above the first shelf. The second shelf should be perpendicular to the first. To use the hot glue gun on this shelf, it will be easier to remove the cage roof first. I actually left the roof off the finished cage, as the dowels really stabilize it, but beware that intrepid bunnies might try to jump from the second shelf to outside the cage. You can always make it the sides higher.
FAQ:
Q. Is this difficult? Do I need any special tools/skills to make my bunny her very own palace?
A. Definitely not! The only thing you need to be able to do is use nylon ties, which are very simple and have instructions on the package (basically, stick long tail through little nubby opening at end and pull). For the "Additions," you do need to know how to safely use a hacksaw (not as dangerous as it sounds) and an electric drill. However, nothing needs to be extremely precise, so a basic skill is fine.
Q How much time does this take to set up?
With a friend, it should take you a little less than an hour. After disassembling and reassembling my own cage multiple times, I can make the entire thing by myself in about 15 minutes. The "Additions" take more time, about an hour and a half including all cutting.
Q. Won't my bunny chew through the zip ties?
A. Maybe. If your bunny is a dedicated chewer, try cutting the ends short and turning all the nubby ends out, where he can't reach them. Most bunnies will test their teeth on one or two ties, then get bored. If you still notice multiple ties coming off every day, you may want to get some telephone wire and wire cutters (Home Depot again) to replace the chewed off zip ties. You should still be able to use the ties on the floor, roof and upper reaches of the cage.
If you find your bunny is chewing the carpet, replace it with grass or straw mats from Cost Plus or Pier One that are totally edible.
Q. If the panels are made of wire grid, can't I just elevate the floor and put a pan underneath the cage, like all the other bunny cages?
A. The problem with the squares in the Creative Cubes is that they are 1" by 1", too big for even the biggest bunny to walk on without support. Besides, the cage is supposed to be a palace, and if your bunny is litter box trained enough to be indoors in the first place, as most bunnies are, he doesn't need the wire floor at all. If you still insist on making a wire floor, raise the Creative Cube floor up one square, and tie down a smaller wire grid onto the Creative Cube floor. Check out Home Depot or Lowe's or a similar store for smaller wire, preferably with squares a few centimeters. Put a sheet of curved plastic underneath to catch droppings/urine.
Q. Can I use this cage outdoors?
A. NO! This cage is not safe enough or sturdy enough to put outdoors. House outdoor bunnies in hutches with fly screen and a good latch or lock.
Q. But we have a covered patio/safe yard.
A. No, no, no, this is not an outdoor cage. Even though your bunny may not get rained on, he would still be prey to mosquitoes, flies, raccoons, stray dogs, and anything else that may wander into your yard. See our page on Myxomitosis for more information.
Q. I've built the cage, but it's too wide to fit out the front door/into our car and we're moving. What do I do?
A. Here's what I do: using nail clippers or scissors, cut the zip ties holding the roof to the walls and the floor to the walls. To save time, money, and a whole mess, cut ONLY those ties needed to remove the floor and the roof whole. What you should have if you lay everything flat are 2 grids of 2 panels by 3 panels, and 1 grid of 2 panels by 6 panels. You can fold them up, move them wherever you want and reconnect them. Just remember not to connect the door panel to the roof or the floor. If you've made the additions, it's the same principal. Just cut a few more zip ties and end up with a few more panels (the shelves).
Q. I've made the cage, but what do I do with all these extra panels?
A. You can build a shelf or two inside the cage, as explained in "Additions" in this brochure. You can make an exercise pen with zip ties. Or, you can make shelving units like it says on the box. :->